Learning Resources for HCR3-Series Multihead Machines
In this section, you’ll find resources for learning to operate Happy HCR3-series multihead embroidery machines.
Basics for New Operators
Found below is a guided tour for learning how to set up your embroidery machine and embroider with it.
THREADING
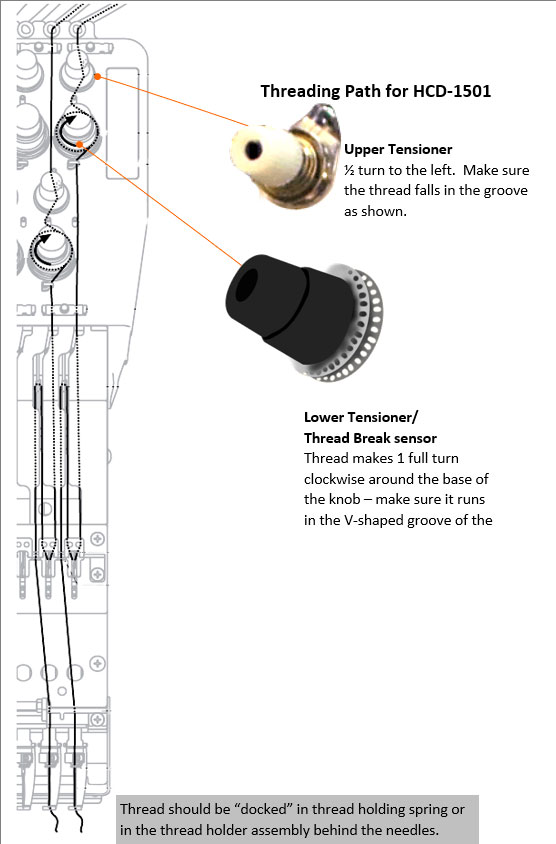
It is important that both upper (colored) thread and lower (bobbin) thread are rounted correctly in the machine for it to sew properly. See the threading diagram below on the right for proper upper threading on your machine. Note that the thread path shown is for HCD2/HCD3, and is the same for the heads on HCR3-series multi-heads. Below, watch a video on how to properly thread the bobbin while checking its tension at the same time.

TENSION
Learning how to set and maintain proper thread tension is necessary to enable your machine to produce consistent, quality embroidery. Proper tension should be set with both threads involved in stitch formation – the upper (colored) thread and the lower (bobbin) thread.
Bobbin Tension – Before setting the upper tension, set the bobbin tension first, following the video procedure shown above. Note that the procedure sets the tension force to be the same as the combined weight of the bobbin case and a full bobbin – which is a good, general setting. Because of this, it is important to perform the procedure only with a full bobbin. If a different tension amount is desired for the bobbin, a different procedure will be required, such as the use of a tension gauge.
Upper Tension – Setting the tension for the upper (colored) spools of thread is done by adjusting the upper and lower tension knobs for each thread. Follow this procedure to efficiently test and set upper tension:
Ensure the following are set before testing and adjusting upper tension, or this tension procedure will not work:
- Bobbin tension is set correctly (see video above)
- All upper (colored) thread(s) being tested are threaded correctly on the machine
Follow this procedure – this will have to be performed on all head(s) you are setting tension on.
- Load a design with moderately wide satin stitches (about 2.5mm wide to 5mm wide), that preferably run in several directions. Many designs with bold-stemmed lettering are good for this, such as the “HAPPYEMB” design that comes built into the machine’s memory. Alternately, you can use THIS DESIGN (htest15.dst), which is designed to test all colors at once.
- Choose a hoop large enough to sew the design at least once, and hoop woven material and cutaway backing, or 2 layers of cutaway backing.
- Assign the colors of the threads you’ll be testing and sew the design.
- Remove the hoop and look at the reverse side of the design. If the upper tension is correct, you should see a (white) bobbin-colored stripe on the reverse side of the satin stems, running down the middle, about 1/4 to 1/3rd of the width of the satin stem. If there is no (white) bobbin stripe or the bobbin stripe is thinner than 1/4 of the width, the upper tension needs to be tightened. If the stripe is wider than 1/3rd the width of the satin stem, the upper tension needs to be loosened.
HOOPING TECHNIQUE
Conventional hoops such as the large square 32cm hoop and round 15cm hoop that come with your machine hold items to be embroidered, sandwiched between a bottom, outer ring and an upper-inner ring with arms that slide into clips on the ends of the machine’s tubular sewing arms. An adjustment screw along the edge of the outer ring adjusts the ring to control grip strength and accommodate for items of various weights and thicknesses.
Alternative Hooping Techniques
- Magnetic (Mighty) Hoops – the built-in magnets in these hoops are strong enough to hold even heavy garments firmly in place, saving the embroiderer a lot of phsical effort and hooping time vs. conventional hoops. The width of the hoop frame also distributes the hooping force and virtually eliminates hoop marks (burn) that can be left on darker garments. Trade-off: higher price than conventional hoops.
- Clamping systems – hold light and heavy items in place with spring-loaded jaws. Instead of hooping, the operator slides the item and backing into the jaws of the clamp (which remains on the machine). The jaws are then levered shut for embroidery, and come off in the same way. In addition to relative speed and convenience over conventional hoops, clamps are able to hold some types of items that difficult to hold with conventional hoops, such as thick leather/vinyl briefcases, Trade-off: higher cost of initial purchase, some physical limitations of where the item can be hooped
- Floating (mounting items on adhesive backing that has been loaded into a hoop)
ADJUSTMENTS FOR DIFFERENT TYPES OF FABRICS
Because of the different behavior of different types of garments and materials, it is important to know how to set up each embroidery project accordingly. Choices about the type of stabilizer (backing and/or topping), needle, the way the design is digitized, tension, and hoop selection can all affect the quality of the final product. Below are some general guidelines. Additional information and choices on stabilizer are available on our TEXMAC DIRECT website.
Stabilizer: a layer of stabilizer hooped underneath the garment that, when bonded to the garment by the stitches of the embroidery design, prevents or minimizes distortion in the fabric that would be caused by the stitching of the design. Most stabilizers fall in these categories:
- Tearaway – a type of stabilizer whose excess edges, after embroidering, can be torn away on the reverse side, leaving little to no visible fringe outside the outline of the design. Recommended for applications where such a fringe would be unacceptable, such as on the reverse side of a towel. Tearaway is the only acceptable type of stabilizer for ballcaps.
- Cutaway – stronger than tearaway backing, enough to require scissors to remove excess after sewing. Generally recommended for most wearables and on any stretchy material.
- Water-soluble topping – hooped on top of the fabric, is used to counteract the distortion and unevenness that textured fabrics would otherwise have on an embroidered design, such as in the case of terrycloth, pique knit fabric, ribbed fabrics, etc. The topping allows the embroidery design to sew more cleanly on such surfaces that would otherwise sew unevenly
- Adhesive stabilizer – for use for items that cannot be effectively held in place by the walls of the hoop, such as on strapping, name tapes, or items that cannot be inserted far enough on the hoop to be gripped on all sides. When using adhesive stabilizer, it is important to check and clean machine surfaces such as needle, presser foot, sewing plate and rotary hook of any built-up adhesive.
Needles – your Happy machine requires industrial-grade embroidery needles, with the generic type designation DBxK5. Needles are available in different sizes (shaft width) and point types:
- sizes: For embroidery, the most commonly used sizes are 75/11 (0.75mm wide needle shaft) and 80/12 (0.80mm wide needle shaft.). 75/11 is good for most general applications, while the larger sized 80/12 can be used for better performance on denser/thicker fabrics, such as the heavy twill of a ballcap or through dense nylon webbing or backpacks.
- point types: Generally, 2 point types are popular. Ballpoint needles sew more effectively on knits, while sharp point needles sew more effectively through woven materials.
Digitizing and the design – if having the design custom digitized (instead of using a pre-existing or stock design), it is important to specify to the digitizer what type of garment or material the design will be embroidered on, which in turn affects how the design is digitized. If the design needs to be sewn on several types of garments (jacket, polo, fleece, hat), most digitizers will only charge an incremental fee for to make different variations of each design. If the design is pre-existing (provided to you by your customer or obtained from a stock design collection, for example), it is especially important to sew test it on similar material to the actual item to be embroidered.
Tension – the procedures provided here for tension should result in a general tension setting that is good for most garments. However, lighter tension settings can be used to minimize puckering and distortion on lighter, stretchier fabrics, while heavier than normal settings can be used for denser, thicker material
EMBROIDERING ON BALLCAPS
Your machine can embroider on finished ballcaps with the optional cap sewing kit, which includes 2 wide-field cap hoops for each sewing head, a stretcher (hooping station) and driver set. Your machine has a continuous sewing area on ballcaps of 3.1″ high (expandable to 3.5″ high) x 14.1″ wide. Some guidelines for embroidering on ballcaps:
- To sew properly on ballcaps, designs must be created especially by the digitizer for ballcaps.
- Only tearaway backing should be used for embroidering on ballcaps.
- The actual max design height is controlled more by the shape of the cap than by the machine. For example, a short, very low-profile cap may have a usable height less than your machine’s cap sewing field height of 3.1 inches.
Watch the 2 videos below for (1) setting up your machine to embroider on ballcaps and (2) how to hoop ballcaps on the wide cap frame.
Video: Setting Up Your Machine to Embroider Ballcaps
Video: Hooping Caps Using the Wide Cap Frame
CONTROL PANEL
Basic Tour
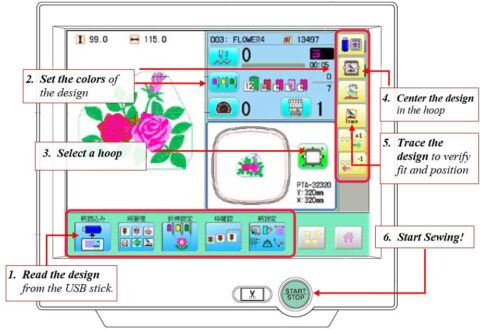
Shown on the right is the control panel for your HCR3-series multi-head machine. Key information is highlighted in the diagram:
-
- Design width and height – shown in millimeters or inches
- Design fit and position – press this button to select hoop and adjust position. Shown to its left is a scale image of the design with its relative position in the sewable are of the selected hoop.
- Design total stitches
- Set max allowable sewing speed – this can be adjusted mid-sew-out.

Steps for Setting Up a Design to Sew
The control panel is easy to use, especially for the most common task of setting up each embroidery job. Shown on the right are numbered directions for setting up a design in the control panel. All key tasks for setting up the design are accessible directly in the front screen. Press the buttons in the numbered order shown to accomplish each step:
-
-
- Load the design from a USB thumb drive
- Assign the colors (needle sequence) of the design
- Choose a hoop and verify fit and position
- Center the design in the hoop
- Trace the design for further verification of fit and position
- Start sewing when ready
-
