RE-LOADING THE BOBBIN CORRECTLY
The bobbin will need to be replaced frequently, allowing only
30,000 to 60,000 stitches per spool. This has to be done
correctly every time.
|
| |
|
 |
 |
|
| |
|
1. Ensure bobbin turns clockwise. Pull thread through
this slit. |
2. Feed
thread through eye
at the end of the metal tension flap.
|
|
|
| |
 |
4. Perform
a drop test to check
tension: like releasing a yo-yo as shown on the right, follow
these steps:
a. Hold the loaded bobbin case
by the free end of the thread - let it hang about 6-12
inches from your fingertips
b. Dip your hand downwards and bring to a quick
stop (but not so suddenly the bobbin falls out of the
bobbin case)
You should cause enough downward momentum that, after
your hand stops, the bobbin case should continue,
unspooling downwards.
c. Watch for 1 of 3 things to happen:
Correct tension: Bobbin case unspools slightly and
stops.
Too Tight: Bobbin case does not unspool at all,
no matter how many times you try the "drop" test.
Too Loose: Bobbin case unspools continuously
without you needing to dip your hand.
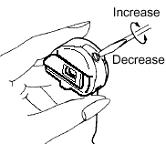
d. Adjust the bobbin tension
by turning the larger of the 2 screws at the base of the tension
flap (right) and
perform the drop test again until the tension is
correct. If you happen to have a bobbin tension gauge,
you'll find that this test should consistently
set the bobbin tension correctly at 23 to 27 grams tension. |

adjusting bobbin tension |
|
`
| |
|
|
|
|
| |
 |
|
|
|
| |
5.
Pass the bobbin thread through the wire loop (shaped like an
inverted "U" at the front of the bobbin case) and allow 4-6
inches to hang from it, down across the front of the bobbin
case. |
|
6. Insert bobbin case (into
the basket of the rotary hook) and close the bobbin case door.
Be sure that the bobbin case is inserted COMPLETELY or
the machine will fail to sew. |
|
|
| |
|


